Posted on

Transform Your Space with Stunning Island Light Fixture Designs

Bright island light fixture illuminating a stylish modern kitchen space.

Introduction to the Island Light Fixture

The island light fixture has become a pivotal element in modern interior design, particularly in kitchens and dining areas. These fixtures not only provide essential lighting but also enhance the aesthetic appeal of a space. Whether you are renovating your home or simply updating your lighting, understanding the nuances of this fixture can greatly influence the overall ambiance and functionality of your area.

Definition and Importance

An island light fixture is designed specifically for hanging over islands, counters, and other similar spaces, providing both task lighting and a decorative focal point. Its significance goes beyond mere illumination; it contributes to the mood of the room, influences the perceived size of the space, and can even define the style. The right fixture can seamlessly integrate with your decor while fulfilling practical needs, making it a crucial aspect of any kitchen or dining layout.

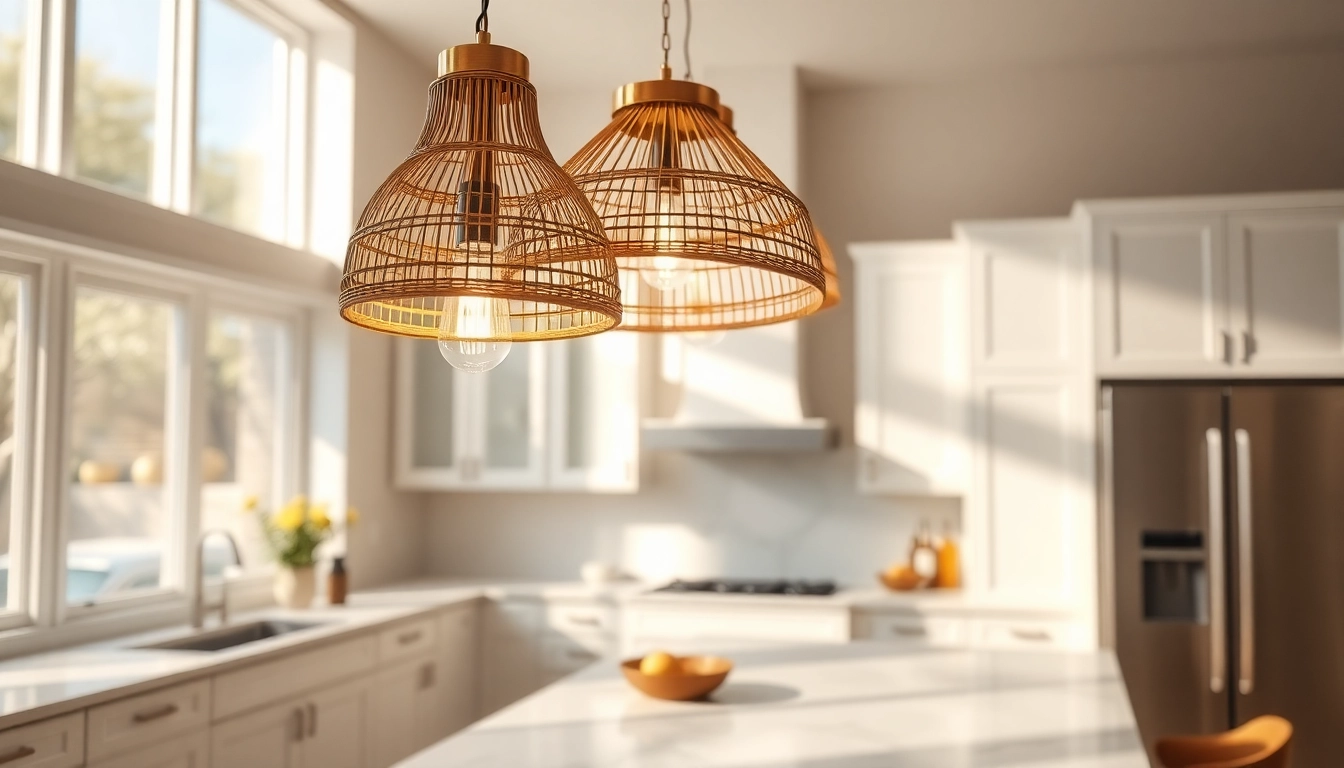
The Versatility of Island Light Fixtures

The versatility of island light fixtures is apparent in their wide range of styles, sizes, and functionalities. From rustic designs to sleek contemporary options, these fixtures can adapt to various design schemes. In a modern kitchen, a minimalist pendant might offer a clean look, while a series of antique-style chandeliers could bring warmth and character to a traditional space. Furthermore, many fixtures now feature adjustable heights and dimmable options, enhancing their functionality for various occasions, from family meals to entertaining guests.

Trends in Island Light Fixture Design

Recent trends in island light fixtures highlight the blend of form and function. Open designs that allow the light to diffuse naturally have gained popularity, alongside materials that showcase craftsmanship and sustainability. For example, fixtures made from reclaimed wood or metal are sought after for their eco-friendly footprint. Additionally, mixed material designs—such as combining glass with metal—add depth and visual interest. Statement lighting, where bold fixtures act as a centerpiece, is also a trend that embodies personalization and uniqueness in home design.

Choosing the Right Island Light Fixture for Your Space

Choosing the right island light fixture can seem overwhelming given the array of options available. However, by systematically assessing your space, you can make a more informed decision that suits both your aesthetic preferences and practical needs.

Assessing Your Room’s Style

The first step in selecting an appropriate island light fixture is to evaluate your room’s overall style. Identify the existing decor elements, including color schemes, materials, and furniture styles. For instance, a modern minimalist kitchen benefits from sleek metallic fixtures, while a farmhouse-style kitchen might prefer warmer, more rustic options. Think about how your chosen fixture will complement or contrast with other elements in the space, ensuring a cohesive look.

Understanding Size and Scale

Size and scale are critical factors when selecting an island light fixture. A fixture should neither overpower the space nor appear too diminutive. To determine the appropriate size, measure your island’s dimensions and consider the fixture’s height and width. A good rule of thumb is to ensure that the bottom of the fixture hangs 30 to 36 inches above the countertop. Additionally, consider the number of fixtures; multiple smaller lights may work better than a single large fixture for bigger islands.

Materials and Finishes Considerations

When it comes to materials and finishes, opt for those that not only match your decor but are also functional and durable. Common materials include metals, glass, and wood. For example, stainless steel offers a contemporary look and easy cleaning, whereas wrought iron may suit a more traditional space. Choose finishes that can withstand the kitchen environment, such as brushed nickel, which tends to hide fingerprints and is resistant to corrosion. It’s essential to balance aesthetics with practicality when selecting materials.

Installation Tips for Island Light Fixtures

Installing an island light fixture may seem daunting, but with careful preparation and attention to detail, it can be a straightforward process. Here are some essential considerations to ensure a successful installation.

Safety Precautions to Take

Before beginning the installation, prioritize safety. Ensure that the power supply to the installation area is turned off at the circuit breaker to prevent any electrical hazards. Use insulated tools, wear rubber-soled shoes, and if you’re using a ladder, ensure it’s stable. Additionally, if you’re unsure about your electrical capabilities, it’s wise to consult a professional electrician to assess the situation.

Step-by-Step Installation Guide

  1. Gather Your Tools: You will typically need a screwdriver, wire cutters, pliers, and wire nuts.
  2. Assemble the Fixture: Follow the manufacturer’s instructions to assemble the fixture if necessary.
  3. Mount the Fixture: Use a mounting bracket to secure it to the ceiling box. Make sure it’s level.
  4. Connect Wires: Match the fixture’s wires to the corresponding wires in the electrical box (black to black, white to white, and ground to ground).
  5. Secure the Fixture: Once all wires are connected, secure any protective coverings and attach any additional decorative elements.
  6. Restore Power: Finally, turn the power back on and test the fixture.

Common Mistakes to Avoid

During installation, avoid common pitfalls that can lead to frustration or safety hazards. Make sure to double-check all wire connections; loose connections can cause flickering lights or electrical shorts. Additionally, ensure that the fixture is properly hung at the correct height to avoid obstruction or inadequate lighting. Lastly, follow all manufacturer instructions precisely, as each fixture may have unique requirements.

Maintenance of Your Island Light Fixture

Maintaining your island light fixture is vital for ensuring it continues to perform well and look its best. Regular care can prevent dirt buildup and potential issues.

Cleaning and Care Techniques

To maintain the appearance and functionality of your island light fixture, adopt a regular cleaning routine. Dust the fixture’s surfaces using a soft, dry cloth or a feather duster to prevent dust accumulation. For fixtures with glass components, use a glass cleaner and a microfiber cloth to avoid streaks. Be cautious with fabrics or more delicate materials that require specific cleaning solutions, and always follow manufacturer care instructions.

Troubleshooting Common Issues

Common issues, such as flickering lights or complete outages, can often be resolved with simple troubleshooting. If the fixture flickers, first check the bulb; a loose or burnt-out bulb can cause flickering. Ensure all connections are secure. If there’s no light at all, verify whether the power supply is active and check the circuit breakers. If problems persist, consult an electrician.

When to Replace or Upgrade Your Fixture

Recognizing when to replace or upgrade your island light fixture will enhance both function and aesthetics. Consider an upgrade if the fixture is outdated or doesn’t provide adequate light. Also, if you notice consistent issues with flickering or dull illumination, it may be time for a new fixture. Lastly, a design overhaul in your kitchen or dining area may warrant a refresh of your lighting to maintain cohesion in your decor.

FAQs about Island Light Fixtures

What types of island light fixtures are available?

Island light fixtures come in various styles, including pendant lights, chandeliers, flush mounts, and linear fixtures. The choice depends on the room’s design and light needs.

How do I choose the right size for my kitchen island?

To select the right size, measure your kitchen island dimensions. A general rule is to allow 30 to 36 inches from the countertop to the bottom of the fixture.

Can I install an island light fixture myself?

Yes, many homeowners can install an island light fixture themselves, but ensure you follow safety precautions and guidelines. If unsure, consulting a professional is recommended.

What are the best materials for durability?

Materials like stainless steel, glass, and durable plastics are excellent for durability. Choose finishes that resist corrosion and wear, especially in kitchen environments.

How often should I clean my island light fixture?

It’s best to clean your island light fixture regularly, approximately every two to four weeks, depending on dust levels and kitchen activity.

Posted on

Expert Velux Repairs: Proven Solutions for Skylight Issues in 2026

Velux repairs expert technician fixing a skylight in a modern home.

Understanding Velux Repairs

Velux skylights are an outstanding option for homeowners looking to brighten their living spaces with natural light. These innovative windows not only improve aesthetics but also enhance the overall energy efficiency of a home. However, like any component of a house, Velux windows require maintenance and occasional repairs. Velux repairs are essential to ensuring that your skylights function properly, remain energy efficient, and maintain their visual appeal over time.

What Are Velux Skylights?

Velux skylights are roof windows designed to bring natural light and ventilation into homes. They come in various styles, including manual and electric options, designed specifically for different roofing types and architectural styles. The versatility of Velux skylights makes them ideal for various settings—from modern loft conversions to traditional homes. When installed correctly, they can significantly enhance the ambiance of any room by maximizing natural light.

Common Issues with Velux Windows

Despite their durability and efficiency, Velux skylights are not immune to problems. Common issues include:

  • Leaks: Often caused by improper installation or damaged flashing, leaks can lead to water damage inside the home.
  • Condensation: This can occur between the panes of glass and is often a sign of a failed seal.
  • Difficulty in Operation: Over time, the mechanisms that allow for opening and closing can become stiff or malfunction.
  • Mold Growth: Poor ventilation can lead to moisture buildup, resulting in mold around the skylight area.

The Importance of Timely Repairs

Addressing issues with your Velux skylights promptly is crucial for maintaining their functionality and aesthetics. Ignoring minor problems can lead to more significant issues, including structural damage, increased energy costs, and reduced home value. Regular maintenance and timely repairs ensure that your skylights continue to enhance your living environment while protecting your investment.

Comprehensive Skylight Repair Services

At Velux Repairs, we offer a range of services designed to restore and maintain the integrity of your skylights. Our skilled technicians specialize in comprehensive repair solutions tailored to meet the unique needs of each customer.

Types of Velux Repairs Offered

Our repair services cover a variety of issues that can affect Velux skylights, including:

  • Glass Replacement: When the glass is cracked or broken, timely replacement is essential to prevent leaks and loss of energy efficiency.
  • Flashing Repairs: Damaged or improperly installed flashing can lead to leaks. We inspect and repair flashing to ensure a watertight seal.
  • Seal Replacement: Over time, seals can fail, causing condensation issues. Replacing worn seals is crucial for maintaining insulation.
  • Operational Repairs: Our team can fix any issues with the opening and closing mechanisms, ensuring they function smoothly.

Step-by-Step Repair Process Explained

We follow a thorough, step-by-step process to ensure high-quality repairs:

  1. Assessment: Our technicians conduct a detailed inspection of your skylights to identify the specific issues.
  2. Customized Recommendations: Based on the assessment, we provide tailored repair options suited to your budget and needs.
  3. Execution: Our skilled team performs the necessary repairs, adhering to industry standards and focusing on quality.
  4. Final Check: After repairs, we conduct a final inspection to ensure everything is functioning correctly.

Preventative Maintenance for Longevity

Preventative maintenance is vital for prolonging the life of your Velux skylights. Regular checks and simple upkeep can help identify potential issues before they escalate. Recommended maintenance tasks include:

  • Cleaning the glass and frames to prevent dirt buildup that can lead to moisture issues.
  • Inspecting seals and flashing for signs of wear or damage.
  • Lubricating moving parts to ensure smooth operation.
  • Checking for signs of condensation and addressing any ventilation issues.

Why Choose Professional Velux Repair Services?

Choosing professional repair services for your Velux skylights ensures that you receive high-quality results. Trained technicians are familiar with the complexities of different skylight models and can provide solutions tailored to your specific needs.

Expert Technicians for Reliable Solutions

Our team comprises certified professionals who undergo regular training to stay updated on the latest repair techniques and technologies. This expertise ensures that all repairs are conducted effectively, minimizing the chances of recurring issues.

Customer Testimonials and Success Stories

Many of our satisfied customers have shared their experiences with us:

“Velux Repairs did an amazing job fixing my skylight! Highly recommend their services for anyone in need.” – James Smith

“The team was professional and quick. My skylight looks brand new. Thank you, Velux Repairs!” – Michael Jones

Transparent Pricing and Free Quotes

We believe in transparency when it comes to pricing. Before any work begins, we provide detailed, free quotes to ensure that you know what to expect without hidden costs. Our aim is to deliver quality service at a fair price, keeping you informed at every step.

DIY vs. Professional Repairs

While some homeowners may consider DIY repairs for Velux skylights, there are important factors to weigh before proceeding.

When to Attempt DIY Repairs

Minor maintenance tasks, such as cleaning and lubrication, can typically be done by the homeowner. However, more complex repairs should be left to professionals to avoid causing further damage.

The Risks of DIY Skylight Repairs

Attempting to repair skylights without proper knowledge can lead to:

  • Inadequate repairs that might not address the underlying problems.
  • Increased costs if further damage occurs that necessitates professional involvement.
  • Personal safety risks, particularly when working at heights.

Evaluating Cost-Effectiveness of Both Approaches

While DIY repairs may seem more cost-effective initially, the potential for oversight can lead to higher expenses in the long run. Professional services, though potentially higher in upfront costs, can save you money by ensuring effective, lasting repairs.

Future Trends in Skylight Technologies

The skylight industry is evolving, with new technologies emerging to enhance energy efficiency and repair solutions. Homeowners should stay informed about these trends to make the best choices for their properties.

Innovations in Energy Efficiency for Velux Skylights

New Velux skylight models are increasingly focusing on energy efficiency. Innovations include:

  • Triple-Glazed Glass: Improved insulation properties help to maintain indoor temperatures and reduce heating costs.
  • Smart Skylights: These come equipped with sensors for automatic opening and closing, ensuring optimal ventilation and temperature control.

Emerging Repair Technologies in 2026

In 2026, we anticipate the introduction of advanced repair technologies, including:

  • Smart Sensors: These will alert homeowners to potential issues, such as leaks or condensation, before they become serious problems.
  • Self-Sealing Flashing: This innovative solution aims to enhance the durability of installations, minimizing maintenance needs.

How Consumer Preferences are Shaping the Industry

Homeowners are increasingly prioritizing sustainability and efficiency when selecting skylights. As such, the industry is shifting towards more eco-friendly materials and practices, making it crucial for repair services to adapt to these changing expectations to remain competitive in the market.

Posted on

Choosing the Right Shower Doors UK: A Comprehensive Guide for Homeowners

Stylish shower doors uk displayed in a modern bathroom environment with natural lighting.

Understanding Shower Doors UK: Types and Features

Selecting the right shower doors uk can transform not only the functionality of your bathroom but also its aesthetic appeal. With various options available on the market, it is essential to understand the different types and features, ensuring a fitting choice for your space. In this section, we will explore the prevalent types of shower doors in the UK, providing insights into their unique features and advantages.

Frameless Shower Doors UK

Frameless shower doors are a popular choice for modern bathrooms, seamlessly integrating into the overall design. These doors are made from thick tempered glass, offering a sleek and minimalistic appearance. Their frameless design not only maximizes space but also creates an illusion of a larger bathroom, as they provide a clear view without any obstructive frames.

One of the main advantages of frameless shower doors is their ease of cleaning. With no second surface to trap grime and mildew, maintenance is simplified. However, homeowners should consider the additional costs associated with these premium options, as they tend to be more expensive than framed variants.

Framed Shower Doors UK

In contrast to frameless options, framed shower doors incorporate metal frameworks, usually made of aluminum or stainless steel, which encase the glass panels. This framework provides added stability and can be customized to fit various bathroom styles. Framed shower doors offer enhanced durability and are often more cost-effective compared to frameless doors.

One common downside is that framed doors can create a visual obstruction, which might not be ideal for smaller bathrooms. Despite this, they remain a fantastic choice for their overall resilience and classic appearance.

Bi-Fold Shower Doors UK

Bi-fold shower doors are an innovative space-saving solution, particularly useful for compact bathrooms. These doors operate with a folding mechanism, allowing them to open up without requiring significant swing space. When opened, the doors efficiently fold against each other, providing easy access to the shower area.

Besides their practicality, bi-fold shower doors can enhance the bathroom’s aesthetic, bringing a modern touch that many homeowners appreciate. However, they may require more frequent cleaning due to the folding design, which can trap soap scum in the hinges.

Benefits of Installing Quality Shower Doors UK

Investing in quality shower doors is a critical decision for any homeowner. Beyond the initial aesthetic appeal, several significant benefits come from choosing the right shower doors.

Enhancing Bathroom Aesthetics

Bathroom designs have evolved significantly over the years, with homeowners increasingly seeking to enhance their spaces with stylish fixtures. Quality shower doors contribute significantly to this effort. They can elevate the entire look of the bathroom, creating a cohesive design that reflects personal taste and enhances overall ambiance.

Improving Space Efficiency

Well-chosen shower doors, especially those that are frameless or bi-fold, effectively utilize space in smaller bathrooms. By offering a sleek design and reducing visual clutter, these modern solutions optimize limited areas, making them more functional and inviting.

Ensuring Water Containment

Water containment is a crucial factor when considering shower doors. Quality shower doors effectively prevent leaks, keeping your bathroom dry and free of water damage. This not only protects your floors and fixtures but also minimizes the potential for mold and mildew growth.

Factors to Consider When Choosing Shower Doors UK

Choosing the right shower doors involves careful consideration of multiple factors that align with your bathroom’s design and functionality requirements. This section outlines key elements to guide your decision-making process.

Bathroom Size and Layout

The size and layout of your bathroom are the foundation of any door selection process. In smaller spaces, bi-fold or sliding shower doors may be the ideal choice, whereas larger bathrooms can accommodate more elaborate designs, such as walk-in showers with frameless doors. Assess the dimensions and layout carefully to ensure a matching selection.

Glass Thickness and Quality

Quality is paramount when it comes to shower doors. Look for doors that feature glass thickness of at least 8mm, providing durability without compromising on aesthetics. Thicker glass models are typically more robust and less prone to breakage, making them a worthy investment.

Style Compatibility with Fixtures

Maintaining stylistic harmony within your bathroom is crucial for a cohesive look. Ensure that your chosen shower doors complement existing fixtures such as faucets, tiles, and cabinetry. A well-matched design enhances the overall aesthetic and makes the space feel unified.

Installation Tips for Shower Doors UK

Once you’ve chosen the right shower doors, the installation process begins. Proper installation is vital for functionality and longevity. Consider these tips to ensure a successful installation.

Preparing Your Bathroom

Before installation commences, thorough preparation is critical. Clear the installation area, removing any existing doors, and ensure the walls and floor surfaces are clean and dry. It’s essential to measure the space meticulously, as slight inaccuracies can lead to complications during installation.

Tools and Materials Needed

Gather all necessary tools and materials before beginning the installation. Key items typically include a drill, level, tape measure, silicone sealant, and screws. Having everything readily available will streamline the process and contribute to better results.

Common Installation Mistakes to Avoid

During the installation process, beginners may encounter common pitfalls. A prevalent mistake is incorrect measurements that can lead to ill-fitting doors. Additionally, failing to use a level can cause misalignments. Always double-check your measurements, and consider seeking professional help if you are uncertain about the installation process.

Maintenance and Care for Shower Doors UK

To preserve the aesthetic and functional attributes of your shower doors, regular maintenance is essential. In this section, we’ll explore effective care tips that will enhance longevity and performance.

Cleaning Techniques for Longevity

Cleaning shower doors should be part of your routine. Use gentle, non-abrasive cleaners and soft cloths or sponges to avoid scratching the glass. Regular cleaning prevents soap scum and mineral deposits from building up, extending the lifespan and maintaining clarity.

Preventing Water Spots and Stains

Water spots can tarnish the clarity of shower doors over time. Installing a protective glass treatment can help repel water and make cleaning easier. Additionally, consider using a squeegee after each use to remove excess water and minimize spot formation.

Routine Checks for Frame Integrity

If you have framed shower doors, conduct routine checks to ensure that the frames remain intact. Look for rust or damage, especially in metal frames, and replace any worn parts promptly to maintain structural integrity and avoid future issues.

Frequently Asked Questions

What type of shower doors are best for small bathrooms?

For small bathrooms, bi-fold or sliding shower doors are ideal. They save space by opening inward or sliding, maximizing your bathroom’s layout.

Are frameless shower doors safer than framed ones?

Frameless shower doors use thicker glass that may be safer, as they are less prone to break. However, proper installation is key to ensuring safety for both types.

How can I prevent mold growth on shower doors?

Regular cleaning and using a squeegee after each shower significantly reduce moisture and mold growth on your shower doors, keeping them clean.

Do I need professional help to install shower doors?

If you’re experienced with renovations, you might install them yourself. However, hiring a professional ensures proper installation and saves time.

How often should I clean my shower doors?

Cleaning your shower doors once a week is recommended. This routine helps prevent the buildup of soap scum and hard water stains, ensuring clarity.